|
|
|
|
News The Project Technology RoboSpatium Contribute Subject index Download Responses Games Gadgets Contact <<< R18 ESP32-CAM R20 mail2code >>> R19, Rover in a suitcase - ConstructionThe video about R19About R19
I had the idea of using a Raspberry Pi in a suitcase as a laptop for a long time. Install four wheels on the bottom and Rover R19 is ready. The so composed coding station should make it easier for me to create program examples for my series on physical computing. MechanicsThe assembly instructions come without dimensions, because the robot was created following the rule of thumb and I just want to give you an impression of how to build your own suitcase robot. Using a larger suitcase is never wrong, because you will quickly find things to install in the additional space, as the possibilities offered by the Raspberry Pi are almost limitless.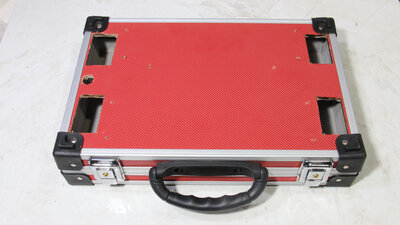
My aluminium suitcase has the dimensions 32x7.5x21.5cm. You must cut openings and drill holes for the wheels on the bottom... 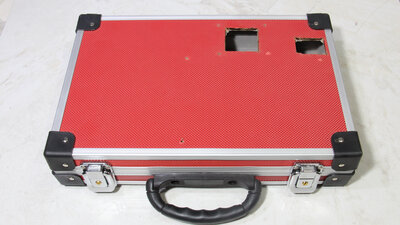
...and for the fold-out camera and at the point where the Raspberry Pi is mounted, on the top. The opening at the position of the Raspberry Pi 4 is supposed to improve the WLAN connection. Even so the side walls of the case are not made of aluminum, but of cardboard and plastic, the signal strength is noticeably reduced. Servos, screen and Raspberry Pi are screwed on the suitcase, the cables, buttons and LEDs are attached with hot glue. Parts list:When buying components via the affiliate partner links I have listed in the table (or through the banners on my pages) you help to keep my my projects going - many thanks! Clicking on the links does not mean you have to buy - you can simply browse through the pages ;-) Of course, supporting my freely accessible educational platform without shopping but by making a donation or becoming a Patreon also works. Many thanks to everyone who already sent me an obol!
Electronics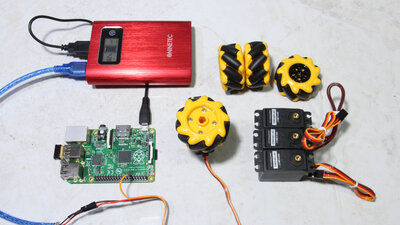
The electronics id based on 4 standard servos for continuous rotation with Omniwheels attached to the output shaft. 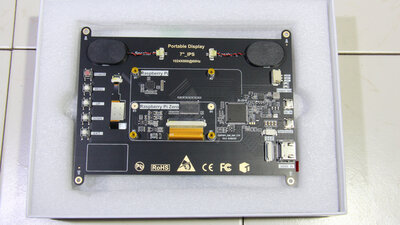
The 18cm (7 inch) touchscreen with a resolution of 1024x600 pixels has an HDMI interface, via which the sound is also transmitted to the two small speakers. The touch function is connected via USB. 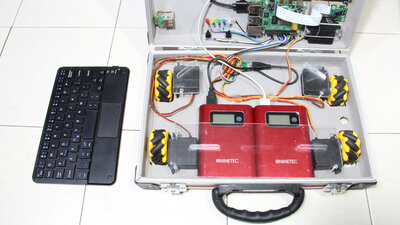
Two power banks provide electric energy, each of them must deliver 2A. One power bank supplies the Rasperry Pi 4 and the touchscreen with electrical energy (the 2A are just enough), the second power bank feeds the servos. The keyboard / touchpad combination is connected to the Raspberry Pi via Bluetooth. 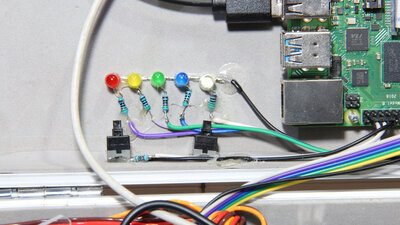
Five LEDs and two pushbuttons make it possible to quickly write a software examples on "Physical Computing" and check whether everything works as it should. 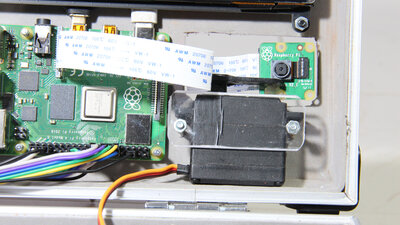
The Raspberry camera module is attached to a fifth servo so that is can be folded out in order to transmit images in robot mode, when the case lid is closed. 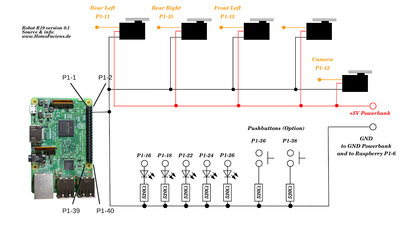
Circuit diagram Software / DownloadThe circuit diagram and the Python scripts for controlling the robot via browser interface are included in the download package (430kb). A more detailed description of how the scripts work and how the web server must be configured can be found in the chapters on Physical Computing.Test drivesHave a look at my RoboSpatium to see what robots are currently available for a test drive. Have fun!<<< R18 ESP32-CAM R20 mail2code >>> News The Project Technology RoboSpatium Contribute Subject index Archives Download Responses Games Links Gadgets Contact Imprint |
|
|