|
|
|
|
News The Project Technology RoboSpatium Contribute Subject index Download Responses Games Gadgets Contact <<< C: GPIOs as output Python: Pulse-width modulation >>> Python: Switching GPIOsThe circuit used in this chapter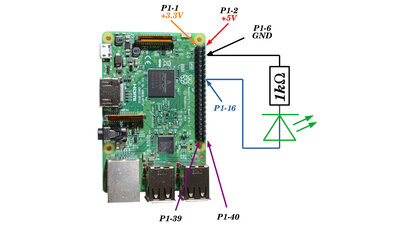
In order to be able to make an LED blink, it must of course be wired to the Raspberry Pi. More about how to connect LEDs to GPIOs is written in the chapter on switching LEDs. Which pins have which function can be found in the chapter on the hardware of the Raspberry Pi. What is Python?Computers process data as binary numbers. Program code must therefore be stored as zeros and ones. Writing such code directly is possible, but veeeery abstract. That is why so-called interpreter software was developed at an early stage in computing history. This turns human readable text into computer-executable, binary code. The Python interpreter does exactly that. The program text to be written, however, cannot be freely formulated, but must conform to the rules of this programming language. For example the text line:Turn on GPIO number 16 Can't be processed by the Python interpreter. Instead, this must be as follows: GPIO.output(16, GPIO.HIGH) The line of text must read exactly like this, matching even upper and lower case letters. The line: gpio.output(16, GPIO.HIGH) cannot be processed by the Python interpreter either. Before the line shown here, which represents the command to switch on the GPIO, further commands are necessary to prepare the GPIO. With that we come to the complete ... Python script to turn a GPIO on and off
The Python interpreter ignores all text that comes after the special character "#". This means that comments in plain text can be inserted in the program code. Such comments should be inserted wherever it makes sense to provide additional explanations as to the purpose of a part of the program. In the example above, I have commented on each line as this is intended for beginners in Python programming. Anyone who is just a little practiced will immediately recognize that the line: GPIO.output(16, GPIO.HIGH) Turns on pin 16. So there is no need for the comment behind it. How many comments you add is entirely up to you. But remember that you eventually have to modify your script after years because of a bug or you'd like to add functions and thats when comments are priceless! In principle, however, all comments can also be removed from the script. This then runs exactly as with the comments. A special case is the very first comment: #!/usr/bin/env python This must be the first line of the script! It indicates to the operating system that this text file is a Python source code and must therefore be called via the corresponding interpreter. Executing Python scriptsAfter storing the text file with the name "blink.py", it can be started in two ways via the command line:Either by calling the Python interpreter with the file name of the script as a parameter: python blink.py or by declaring the file as being executable: chmod a+x blink.py and this is then started like all normal programs: ./blink.py Do not forget "./" in front of the file name! Furthermore, you have to change to the directory in which you the "blink.py" is stored before using the commands. As mentioned above, the second version only works if the first line in the script is: #!/usr/bin/env python What to do if errors happenThe Python interpreter outputs messages if something in the program code is not written as expected. These can be warning messages that (sometimes) do not have an impact on the program execution or errors that lead to the execution being terminated. These messages are meant to be read and understood! The most important information is the program line on which the error occurred. If you search the net for descriptions of the error message, you will quickly find help, but NO, as a beginner you shouldn't start a new post in the appropriate forums because of every sh... Keep searching until you find the answer, because beginners mistakes have been made by thousands and thousands of beginners before you! Find the answer before you start wasting other people's time with your little problems! So far I have found a solution to all my questions on the Internet without typing any post in any forum, but sometimes you will have to spend a couple of hours. Yes, coding is nothing you will learn in an afternoon and some problems will keep you busy for days before you will find a solution. That's simply the way it is! You must spend lots of time to outgrow the "Setup.exe clicker" level. The reward you get is that in a world that is more and more ruled by technology, you will gain insights into data processing that is for ever hidden from the "Muggles", the non-coders.However, don't hesitate to leave a comment, if you find errors on my pages of if there is something you find hard to understand (what, exactly?) or that is missing from your point of view. <<< C: GPIOs as output Python: Pulse-width modulation >>> News The Project Technology RoboSpatium Contribute Subject index Archives Download Responses Games Links Gadgets Contact Imprint |
|
|