News    The Project    Technology    RoboSpatium    Contribute    Subject index    Download    Responses    Games    Gadgets    Contact   


<<< Python: Commandline parameters         File upload to webserver >>>

Apache Webserver

What is a web server good for?

Web servers are those computers on the World Wide Web that provide content that can then be accessed using a browser. This text, which is currently being displayed on your screen, is stored as a file on such a computer, also known as a server. To call this file, you either entered the address of my server (which is unlikely, because I don't know it by heart), or you followed a so-called hyperlink (short: link) (which is more likely). The web pages that can be called are stored on the web server in Hypertext Markup Language format. These are text files that can contain special commands. A link is such a command that redirects you to another website as soon as you click on it.
In order for a computer to operate as a web server, appropriate software must be installed, that can interpret all the necessary commands that you (mostly without being aware of) send in order to be able to view a page. The most common software of this type is the Apache web server, the source code of which is maintained by the Apache Software Foundation and made freely available to everyone.

Remote control via WWW

As soon as more than one computer is required to implement a project, these computing servants have to communicate with each other. Handling this communication with the help of the Hypertext Transfer Protocol via web servers simplifies the necessary coding work for two reasons:
(1) One can access an existing, global infrastructure.
(2) A browser interface can be used to set up a graphical user interface very quickly, which runs on many different operating systems, without building up any dependencies on any "app stores" with dubious terms of use.

Installing Apache

The installation instructions described here refer to RaspiOS and thus apply to almost all operating systems based on Debian Linux.

In the example I assume that the Raspberry Pi OS with desktop is installed (Lite can cause problems). It is strongly recommended to perform a fresh installation if problems occur while following the instructions on this page.
  • Open a Terminal window (Ctrl+Alt+T) on the Raspberry Pi and change to your home directory (which is usually the case when a terminal is started):
    cd /home/pi
  • Update the package repositories:
    sudo apt-get update
  • Install the Apache web server with:
    sudo apt-get install apache2
  • Create the directories "www" and "www/python" with:
    mkdir www
    mkdir www/python
  • Now, open the file
    /etc/apache2/sites-available/000-default.conf
    in a text editor:
    sudo nano /etc/apache2/sites-available/000-default.conf
    and replace the line:
    DocumentRoot /var/www/
    with:
    DocumentRoot /home/pi/www/
  • Open the file:
    /etc/apache2/apache2.conf
    in a text editor:
    sudo nano /etc/apache2/apache2.conf
    and insert at the end:
    ScriptAlias /cgi-bin/ /home/pi/www/python/ <Directory /home/pi/www/python/> Options ExecCGI AddHandler cgi-script cgi py </Directory> <Directory /home/pi/www/> Options Indexes FollowSymLinks AllowOverride None Require all granted </Directory>
  • Activate the execution of CGI scripts with:
    sudo a2enmod cgi
  • Create the user group "www-data" with:
    sudo addgroup www-data
  • To be able to access the GPIOs, add user "www-data" to the group "gpio" with:
    sudo adduser www-data gpio
    If images from the Raspberry camera are also to be transmitted via the web server, as I do with my robots, the user "www-data" must also be added to the "video" group:
    sudo adduser www-data video
    If scripts on the webserver need to access the USB interface, the user "www-data" also must be added to the "dialout" group:
    sudo adduser www-data dialout
  • Restart Apache with:
    sudo systemctl restart apache2
  • You can now check whether the web server is running properly. To do this, open a browser and enter the IP address of the computer running the web server, e.g .: http://192.168.2.104
    It is essential to enter "http://" in front of the IP address, otherwise the browser tries to establish an encrypted connection (https://), which will not succeed. You can find the IP address of the Linux computer running the web server with the command:
    ifconfig
    The output is something like:
    wlan0: flags=4163  mtu 1500
            inet 192.168.2.104  netmask 255.255.255.0  broadcast 192.168.2.255
            inet6 2003:f0:af25:88e7:abe:acff:fe06:7974  prefixlen 64  scopeid 0x0
            inet6 fe80::abe:acff:fe06:7974  prefixlen 64  scopeid 0x20
            ether 08:be:ac:06:79:74  txqueuelen 1000  (Ethernet)
            RX packets 28054  bytes 18046269 (17.2 MiB)
            RX errors 0  dropped 206  overruns 0  frame 0
            TX packets 7293  bytes 1136959 (1.0 MiB)
            TX errors 0  dropped 0 overruns 0  carrier 0  collisions 0
              
    The IP address is displayed directly after "inet". If the Apache test page is displayed, the installation is complete.

Switching a GPIO via a web server

Next, a GPIO will be switched via a Python script. I use the example from the chapter Python: Switching GPIOs. The script needs minor changes, because the web server expects certain lines to be printed in plain text at the beginning and at the end of the script:
1
2
3
4
5
6
7
8
9
10
11
12
13
14
15
16
17
18
19
20
21
22
23
24
25
26
27
28
29
30
31
32
33
34
35
36
37
38
#!/usr/bin/env python  
 
# To make a Python script work on a web server,  
# special text lines must be printed at the beginning:  
 
print("Content-type: text/html\n\n") # double line ending needed!  
print("<html><head>")  
print("")  
print("</head><body>")  
 
 
import RPi.GPIO as GPIO  
from time import sleep  
 
GPIO.setmode(GPIO.BOARD)  
 
GPIO.setup(16, GPIO.OUT)  
 
loopCount = 0  
 
while (loopCount < 3):  
    GPIO.output(16, GPIO.HIGH)  
    sleep(0.1)  
    GPIO.output(16, GPIO.LOW)  
    sleep(1)  
    loopCount = loopCount + 1  
 
GPIO.output(16, GPIO.HIGH) # Turn LED ON  
sleep(2)                   # Do nothing for 2 seconds  
GPIO.output(16, GPIO.LOW)  # Turn LED OFF  
 
# Free all GPIOs for use in other programs  
GPIO.cleanup()  
print("...all done, end of script reached!")  
 
# Finally a terminating text line must be printed to make the script  
# work with a web server:  
print("</body></html>")  
    
  • if the Python script is stored in "/home/pi/" with the name "blink.py", it must be declared to be executable:
    chmod a+x blink.py
    Now, copy the script to "www/python/":
    sudo cp blink.py www/python/
  • The script is prepared to be called from a browser, by typing the IP address of the web server, followed by "/python/blink.py":
    http://192.168.2.104/python/blink.py
    Again, the IP address must be after "http://"!
  • The LED should start flashing and after that the text:
    "... all done, end of script reached!"
    will appear in the browser. If you call the source text of "http://192.168.2.104/python/blink.py" via your browser, you will not see the source text of the Python script, but the source text of the website, which the script generated via the "print" commands:
    <html><head> </head><body> ...all done, end of script reached! </body></html> That has to be the case, because we have configured the Apache web server in such a way that all files in the "www/python/" directory that end with ".py" should be executed and not transferred as plain text. Only the lines of text that the script generated via the "print" commands are transmitted to the browser.

    If the file "blink.py" is copied to the root directory of the web server, which is "/home/pi/www/" with our configuration:
    sudo cp blink.py www/
    and you call that file with your Browser via the address line:
    http://192.168.2.104/blink.py
    so either the source code of the script will be displayed in your browser, or you will be offered to download the file "blink.py" to your computer. In order for a script to be executed by the web server,
    (1) this has to be stored in the directory "/home/pi/www/python/",
    (2) the file extension must be ".py",
    (3) the first line in the script must be "#!/Usr/bin/env python",
    (4) the executable bit of the file must be set (sudo chmod a+x *.py),
    (5) the file must be owned by www-data (sudo chown www-data:www-data /home/pi/www/python -R),
    (6) and finally the script must output the basic structure of an HTML file via "print" commands.
The GPIO can thus be controlled from any other computer that has access to the Raspberry Pi with the running web server.

"It doesn't work!"

...is, as told before, no statement suitable to get any help! Each installation step of the Apache web server outputs a message. Please read these messages through, because that's what the programmers wrote the messages for! Search the internet for these error messages and you will find Gigabytes of help. If everything (apparently) went smoothly during the installation, but it still does not work, the browser displays an error that can help finding the cause of error. Even better are the error messages, the web server generates in it's log file:
tail /var/log/apache2/error.log
The messages stored in this file are especially helpful if you want to ask someone for help. For simple problems this can be done via leaving a comment on this page. For trickier problems you should read how you can get in touch with me in my column contact.

"It works!" is a statement that needs no further explanation, but makes me always happy to read.
... and anyone who would like to thank me in particular for these instructions or any kind of help can make a donation to give me a boost in motivation for creating more of such chapters - many thanks to all backers that already sent me an obol!


Web server Apache running on a Raspberry Pi Model B+
Figure 1:
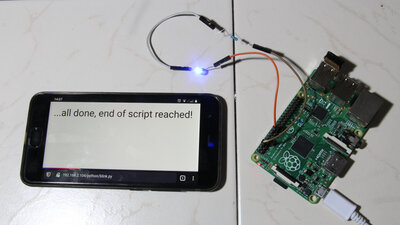
...if the LED flashes, everything is installed correctly. The Apache web server runs smoothly even on a Raspberry Pi Model B+. I called the script with a smartphone - no "app" is required, a simple browser is sufficient.


<<< Python: Commandline parameters         File upload to webserver >>>


News    The Project    Technology    RoboSpatium    Contribute    Subject index    Archives    Download    Responses    Games    Links    Gadgets    Contact    Imprint   


Twitter YouTube Hackaday Patreon TPO