|
|
|
|
News The Project Technology RoboSpatium Contribute Subject index Download Responses Games Gadgets Contact <<< Plotter from 3D printer Ping Pong Plotter >>> Turning a Zonestar 3D printer into a 2D dot matrix printerThe video about the Zonestar plotterGet the Zonestar 3D printer at Gearbest.com Have a look at the column Shopping Tips to get more special offers. The printer ships with no filament, thus don't forget to order filament. Additional hardware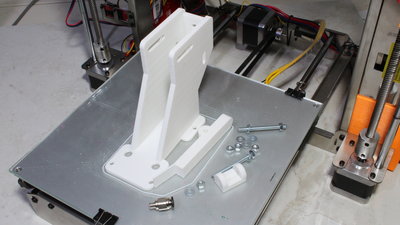
Besides the parts needed for the plotter conversion, three more components have to be be printed. Additionally you need two pieces of 4mm threaded rods and a second quick-release fastener for the Teflon tube of the filament feed is screwed in at top of the new component. You can also use the original one and screw it in and out when converting the printer. 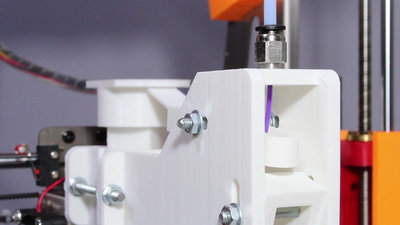
The pen is now lifted through a lever. To prevent the lever from moving too far downwards I have added a stopper. The lever is driven by the extruder motor. When the filament is fed in, it presses on the lever by what the pen goes up. When the filament is pulled back, the pen goes down - following gravity. Due to the leverage, moving the filament by only about 4mm is enough to raise the pen by 15mm. If the feed rate of the filament is increased, the pin can be dropped and raised about 4 times in one second. In order to make the filament really move, the printer has to be prepared for "cold extrusion" be the G code commands "M302 P1". After that, heating up to at least 170°C as said in the video is not needed. 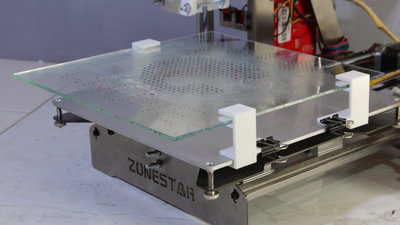
For T-Shirt printing I am using spacers, lifting the glass tile for 20mm so that the rest of the T-shirt fits underneath. 
In order for the pens to still fit under the parked pens while printing, I also had to raise the mount on the upper frame. In the 3D files of the printer I have modified the mounts, so that the 10mm nuts I am using as spacers are not needed. 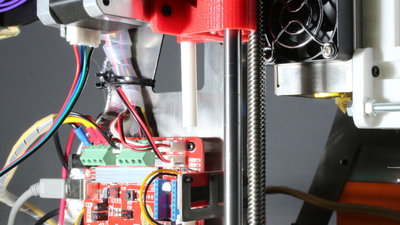
For T-Shirt mode (raised glass tile) I am using the longest (43mm) spacer for triggereing the Z end switch. SoftwareWith the printer conversion, the Zonestar still works in plotter mode. As shown in the previous chapter, I am using a Perl script to convert SVG graphics into Gcode commands. With the variableThe script "bmp-2-gcode.pl" is new. It is meant to convert bitmap graphics into Gcode commands. Note the following: (1) Save the graphic in a color depth of 24 bit, without compression. (2) Only the colors Black (rgb=0,0,0), Red (rgb=255,0,0), Green (rgb=0,255,0), Blue (rgb=0,0,255) and White (rgb=255,255,255) are accepted. All other colors are assigned to one of those colors. Edit the source cord of the scripts to set the dot size and more parameters. You can get all 3D files of the Zonestar conversion as well as the software in a download package. Note the readme.txt! Sample prints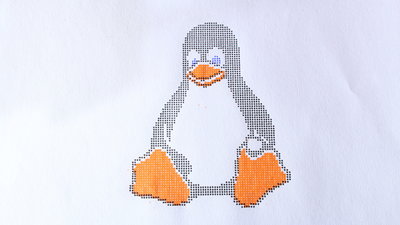
Tux in draft mode: The dot matrix and grid pitch are clearly visible. It can also be seen that the orange dots don't fit exactly into the dot matrix of the black and blue pens - the areas are slightly shifted downwards. Reason for this is, among other things, the bend tips of the felt pens due to the hammering on the paper. This offset can be corrected by software - inkjet printers perform a calibration routine after cartridge replacement for similar reasons. Print time approximatels 10 minutes. 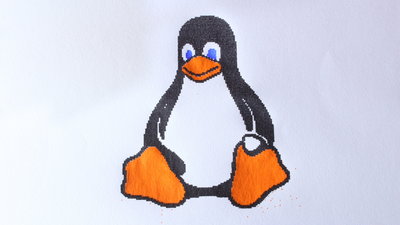
Tux in HQ mode: The Tux in high resolution is much clearer to see on the paper surface. However, the printing time was much higher and more ink was used. Hammering on the hard surface has another negative effect: In particular, the ink of the orange pen has spread so-called "satellite drops" on the paper. How matrix printers work is still evident in the graphics even in high resolution mode when having a closer look - I like it! 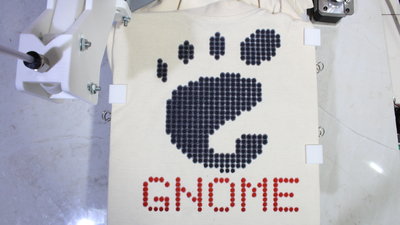
T shirt print: Besides paper, you can print on many other surfaces as well - here I have colorized a T-shirt. For the graphic, I used large markers with permanent ink in a 5mm grid. The ink is definitely not perfect because the dots frazzle on the fabric - this is just a first try. The glass tile is inside the T-shirt and it is mounted with printed clamps that raise the glass for 20mm so that the rest of the T-shirt fits underneath. 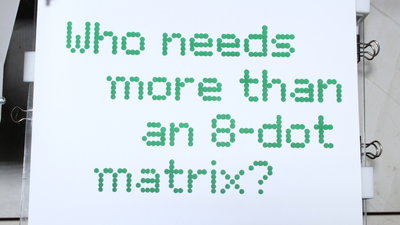
8 dot matrix: Anyone being more talented in creating graphics than I am - and this is for sure the overwhelming majority of mankind - can dive into dot painting with this machine. <<< Plotter from 3D printer Ping Pong Plotter >>> News The Project Technology RoboSpatium Contribute Subject index Archives Download Responses Games Links Gadgets Contact Imprint |
|
|