|
|
|
|
News The Project Technology RoboSpatium Contribute Subject index Download Responses Games Gadgets Contact <<< EDM: Wagners Hammer (1) EDM: Wagners Hammer (3) >>> EDM: Engraving metals with "Wagners Hammer", Part 2The video about engraving with Wagners Hammer, Part 2Version 3.1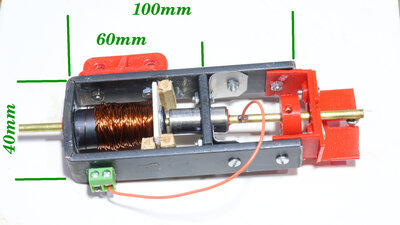
Version 3.1 of my Wagner hammer consists of a frame made of flat iron (20x3mm) with a ferrite core (10mm outer diameter, 5mm inner diameter) on which 200 turns of enameled copper wire (0.35mm) are wound. Cut the flat iron half trough to make bending easier. The magnetic field is guided along the frame in such a way that the circuit is closed via a movable piece of steel pipe as soon as the coil is energized. The flat steel and steel tube are anything but optimal, so that eddy current losses and magnetic saturation consume a noticeable portion of the input energy. But that doesn't mean that version 3 of my Wagner hammer wouldn't work. Version 3.1 ist my best lifting magnet so far. Version 2.1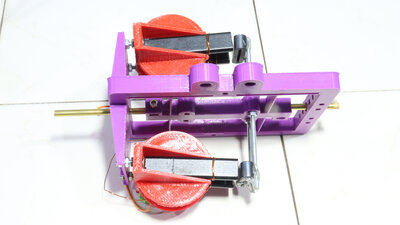
In order to be able to experiment better with current and lifting forces, I designed version 2.1. Like version 2.0, this works with a compliant mechanism to guide the hammer. However, the electromagnet is attached to the side of this frame. This means that a wire can be inserted from above into the brass tube that serves as a hammer. Using wires as electrodes I have achieved the best results so far when engraving. The electrode is fixed at the bottom of the tube with a screw. A second electromagnet of the same design is mounted on the back of the frame, which also pulls on the armature. Measurements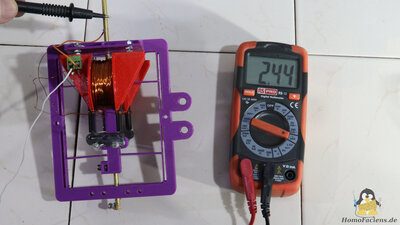
With a current of about 8A and a lifting force of 130g, version 2.1 engraves with the two electromagnets connected in parallel, without problems, generating very smooth lines. With the two electromagnets connected in series, a current of 2.5A flows and generates a lifting force of around 40g. This means that the tungsten wire used as an electrode occasionally sticks to the workpiece when engraving the steel disk. With just one electromagnet there is a current of 5A, which generates a lifting force of around 60g. This also means that the electrode sometimes sticks. In version 1, a current of 6A flows through the air coil, which generates a lifting force of 30g. A current of 5A flows through the windings of version 3.1 with a lifting force of 90G. I also achieved very good results when engraving with this "Wagner hammer". HomoFaciens Coin with Version 3.1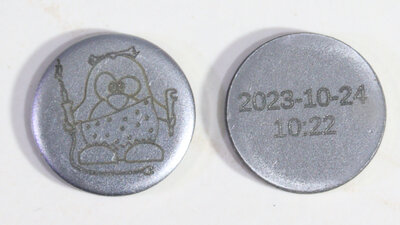
The engraving seen here was done with version 3.1 of my Wagner hammer. The "coin" has a diameter of 20mm, the graphic is 15x16mm small. The time stamp of production is engraved on the back with a digit height of 2.2mm. Engraving was done using 0.2mm tungsten wire as an electrode. If you would like to purchase such a "HomoFaciens Coin" to get an own impression of how good the engraving is: You can support me financially in my experiments and receive a "coin" like this as a thank you for donations of €15 or more (don't forget to mail me your postal address if you want a coin). 3D filesI have designed the files with OpenSCAD. The scad file as well as all parts as STL files are available as download package. I used PET-G to print the parts.<<< EDM: Wagners Hammer (1) EDM: Wagners Hammer (3) >>> News The Project Technology RoboSpatium Contribute Subject index Archives Download Responses Games Links Gadgets Contact Imprint |
|
|