|
|
|
|
News The Project Technology RoboSpatium Contribute Subject index Download Responses Games Gadgets Contact <<< Imprint ...to be continued. >>> 3D printer Zonestar M8R2The video about the Zonestar M8R2 3D printerGet the printer at Gearbest.com_ Special offer with Coupon Code: 0109M8R2 Have a look at the column Shopping Tips to get special offers. Limitied offer for CR-10S with Coupon Code: HFM8R2 Only two small spools of PLA filament come with the kit, thus don't forget to order filament. About the printer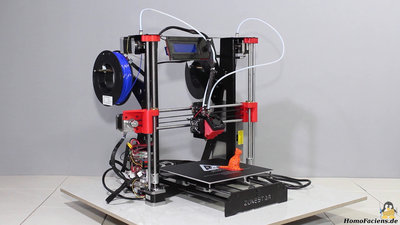
The frame is made of 1.5mm steel panels which is not the thickness of tanks. As a result, the construction bends noticeably at the top when applying side load. Two extruder motors forward 1.75mm filament into one hotend. With this 2 in 1 concept you can print objects in two different colors using one type of plastics. The design of the mechanics of this extremely low-priced filament printer is more or less based on the Prusa i3. A large community grew over the years around printers of this type, so there are gigabytes of files available enabling tinkerers to upgrade hard-and software of the M8R2. Considering the low price, you can't expect to get a perfect machine and you must be willing to upgrade the design by yourself, however there are more expensive printers available that turn out to be imperfect out of the box as well. Improving a machine is part of the fun for all tinkerers like me. AssemblyYou can download the tool I used to align the X axis.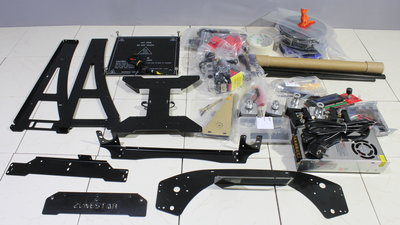
The M8R2 ships as a kit with only a few components being preassembled, so that it is great for people that want to understand how filament printers work. The build instruction is on the SD card that ships with the printer. It's not in perfect English, however the numerous drawings are self-explanatory. 
I needed 6 hours for the assembly and I took many pictures and recorded a couple of video sequences in that time as well. Those pictures are available as download package (35MB) and are meant to help if you run into trouble during the assembly of your printer. Electronics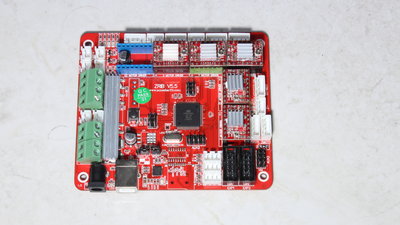
The mainboard offers many free interfaces for upgrades: There are interfaces for filament sensors, a second hotend or a distance sensor so that you can implement auto leveling. 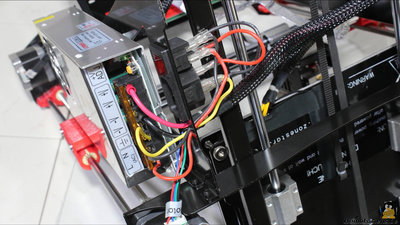
The wiring is done quickly - all motors and end switches have plugs with protection against reverse polarity and all cables are covered with fabric tubes. Heated bed and hotend are connected through screw terminals, however that's where polarity doesn't matter. Screw terminals are also used for the power supply of the mainboard, but here the wrong polarity will damage your printer immediately! Keep in mind that the black cable must be connected to ground, while the red cable is for the +12V line. 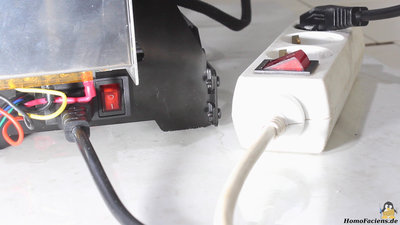
The insulation of the terminals of the mains voltage is insufficient. Same is for the power supply, a type often used in cheap printers. Additionally, the power switch is a bit hidden and close to the terminals of the mains voltage - my advice is to leave it in ON position and use a switchable socket - with that you can turn off the printer quickly in case something goes totally wrong. Firmware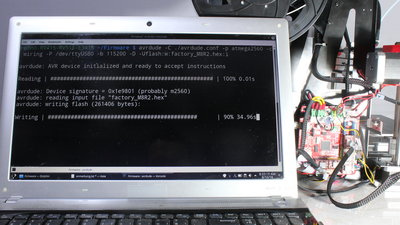
The firmware installed on my M8R2 was based on Repetier, offering lots of adjustments. Meanwhile I got a mail from the Zonestar team that a new version is available. This one is based on Marlin, having fewer submenues, but resulting in better print quality. The hex files of both versions are available as download package (1.3MB). Unfortunately the source code is not available. Upgrades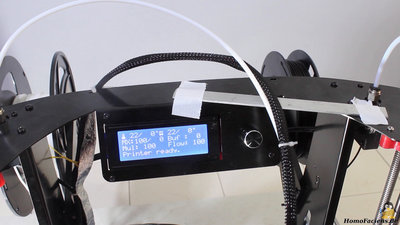
The only upgrade I have implemented yet, is a aluminum bar on top of the frame that keeps the cables away from the dial switch. Leave a comment if you already have any experience in upgrading your own M8R2 or if you have ideas of how to improve this printer - thanks! Sample prints
Material: PLA Layer height: 0.2mm Dimensions: 150x20x22mm Print time: 10 Stunden When going from the extruder motor with the black filament to the one with the blue plastics, there is no rapid change in color on the nozzle. Not until all of the molten, black plastics inside the hotend is squeezed out of the nozzle by the blue filament, the color change is done. You must design your object in such a way, that the change in color happens while printing the inner structure so that the visible, outer perimeters are printed afterwards. It's tricky to design, but as you can see, it works fine with the labeled cuboid shown here. The change back from blue to black also needs a couple of millimeters of filament until it's done. 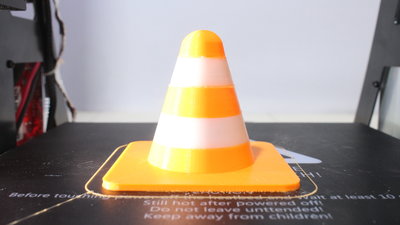
Material: PLA Layer height: 0.2mm Dimensions: 88x88x60mm Print time: 2.5 Stunden More simple to design and print are changes in color between layers. Same as before, the change from orange to white doesn't happen immediately, however it's not that important, where inside the layer it appears. 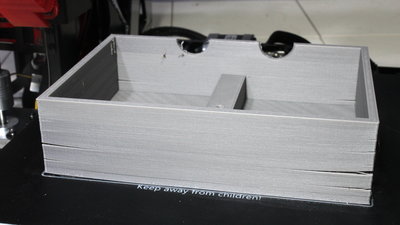
Material: ABS Layer height: 0.2mm Dimensions: 150x110x40mm Print time: 8 Stunden With a maximum temperature of the print bed of more than 100°C, you get a good adhesion of ABS on the surface of the build plate - the box I am printing here has a base area of 15x11cm. However, sticking on the build plate isn't all you have to fight when printing materials with a high rate of shrinking - you can see cracks between layers on the edges. If you do lots of prints in ABS, you should consider building an enclosure for the M8R2, which also helps fighting the bad smell of fumes evaporating from ABS while printing. The M8R2 can print smaller objects using ABS with no problem. 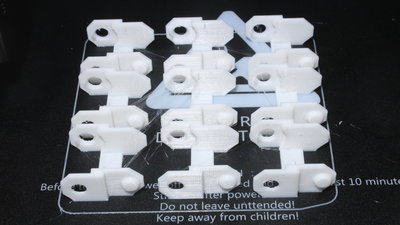
Material: PLA Layer height: 0.2mm Dimensions: 34x30x16mm Print time: 9 Stunden A disadvantage of the 2 in 1 hotend is Oozing - you can see lots of thin strings between the parts, however they are easy to remove after the print is finished. The over all print quality is not outstanding, but good - the chain links work as they come out of the printer and that's what counts in rapid prototyping. <<< Imprint ...to be continued. >>> News The Project Technology RoboSpatium Contribute Subject index Archives Download Responses Games Links Gadgets Contact Imprint |
|
|