|
|
|
|
News The Project Technology RoboSpatium Contribute Subject index Download Responses Games Gadgets Contact <<< Plastic powder (2) Direct granules extruder V1 >>> Plastic powder with mill V3.0The video about turning failed prints into powderThe mill I am usingIs from the online retailer VEVOR. This is the version with a capacity of 2500g and an electrical output of 3750W.Build instruction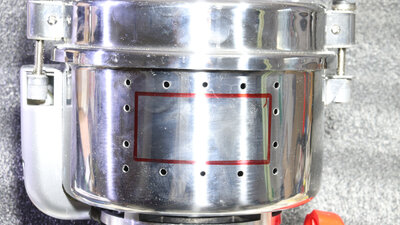
To attach the sieve, drill holes in the front of the pot and make a cutout with a Dremel. 
The sieve with holes of around 1.9mm was made from 0.5mm sheet steel using my spark eroding machine. During operation, this material turned out to be too weak, so thicker sheet steel will be used for the replacement part. The parts are printed from PET-G. When milled, the housing heats up to well over 40°C, which means PLA is not suitable as a material. 
Magnets are built into the outlet to hold back metal chips. When grinding, the grinder itself is always ground a little. Works, but...
...when grinding, raw forces act and this caused a part of the blade to crumble. The magnet filter has proven to be very effective and has retained the resulting metal shavings. 
The sieve also suffered and an excessively large hole appeared in one place. External power regulation
The motor of the mill has a maximum output of 3.7kW. To extend the life of the grinder, it is strongly recommended to reduce the power. I use an external regulator that can handle 4kW in continuous operation. 
Since this cheap product does not have a protective earth ex works, I retrofitted this extra cable into the plug and socket. Yield
The yield of ground PLA here is 188g after the mill has been running for 2 minutes. Since it heats up significantly during operation, a cooling break of 10 minutes must then be taken. So far I have successfully milled old prints made from PLA and PET-G. DownloadThe Download package contains the 3D files for printing the parts for the outlet with the sieve. These should be printed from PET as PLA cannot withstand the temperatures.<<< Plastic powder (2) Direct granules extruder V1 >>> News The Project Technology RoboSpatium Contribute Subject index Archives Download Responses Games Links Gadgets Contact Imprint |
|
|