|
|
|
|
News The Project Technology RoboSpatium Contribute Subject index Download Responses Games Gadgets Contact <<< Plasma printer WorldPrinter >>> Controlling a HP6602 printheadThe video about the HP6602 printheadInkjet printer prototype
I have always wanted to build an inkjet printer and now the project was launched with an email from Theo Deutinger. The question was whether I could build a particularly slow but continuously working printer for a planned art project. I think I can and on this page I present a first prototype. If you want to get to know the sponsor behind this project better, the internet address of his architectural office is www.td-architects.eu. 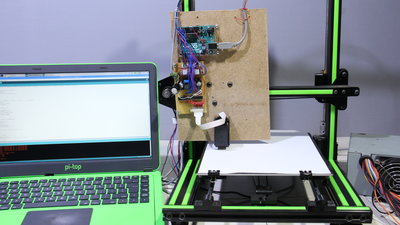
For a very first test, I used the mechanics of a discarded 3D printer. The entire electronics is screwed onto a hardboard, which in turn is attached to the X axis instead of the extruder. The paper is clamped onto the print bed and moved along the Y axis by a second stepper motor. The print head can be manually adjusted to the desired height above the paper surface using the spindles of the Z axis. HP6602 printhead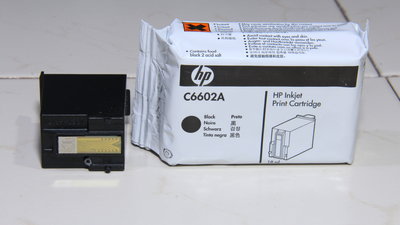
The heart of the printer is the HP6602 printhead, which was installed in commercial printers and fax machines that are no longer available on the market. There are various pages on the Internet about this inkjet print head. I found the description by Nicholas C Lewis (http://nicholasclewis.com/projects/inkshield/theory/) and used it as a guide for my experiments. 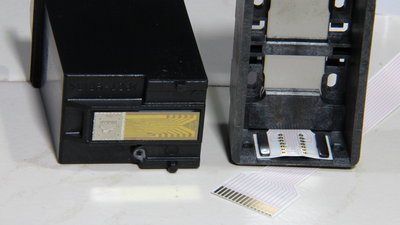
Since the contacts of the printhead are very close to each other, I immediately gave up the idea of building my own adapter when I was holding a cartridge in my hands. The corresponding brackets and ribbon cables are still available for purchase, which has made the construction of the printer much easier. 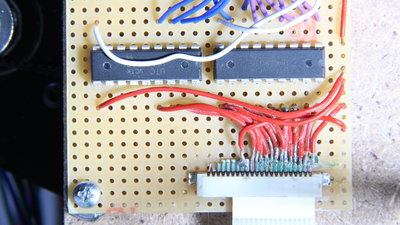
The FCP cable (Flexible Printed Cable) is connected to the board via so-called FFC (Flat Flex Connetor). For the first test I cut and ground such a socket from the board of an old printer with a Dremel - as you can see, it is intended for more than 16 contacts. The pins of the socket are very close together, which makes soldering quite tricky. After soldering, it is essential to test with a continuity tester whether there are no short circuits between near-by pins and whether there is a conductive connection to all contacts of the printhead holder. For further tests, I bought suitable sockets in which the pins are led outwards at a greater distance. The FFC connector must have a 1mm pitch at the cable side and a total of 16 pins. 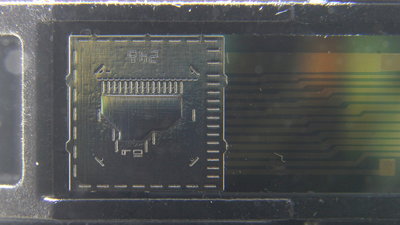
The 12 nozzles of the print head are controlled with pulses of 3μs duration at a voltage of 18V. According to the source given above, 5-6μs pulses at 21V should be used, but if less is possible, I always recommend operating at the lower end of the scale. I hope that the print heads will last longer at 18V. Excessive voltage or activation for too long will immediately destroy the corresponding nozzle! I had connected one of the nozzles to GPIO 13 and had not considered that this pin is always activated for a few milliseconds when the Arduino UNO is switched on, which can be seen from a flashing LED on this pin. This nozzle then stopped working ... The nozzles must be activated one after the other! Letting two or more nozzles eject a drop of ink at the same time won't work! After activating one nozzle, a pause of 0.5μs is needed before the next (but not the same) nozzle can be activated. Before one and the same nozzle can be activated a second time, a pause of 800μs is needed! The size of the ink drops cannot be varied. There is only: drop out or no drop out. Elektronics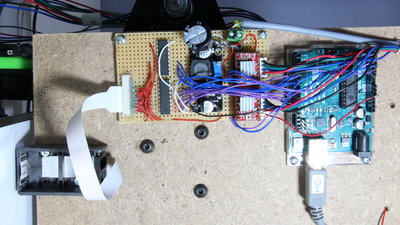
The electronics consist of a computer power supply that provides 12V DC, a boost-up converter that raises this voltage to 18V, an Arduino UNO that generates the control pulses and two ULN2803 chips that convert the 5V of the GPIOs to 18V level. For the tests, I screwed all the components onto a hardboard that is attached to the X-axis of a discarded 3D printer. 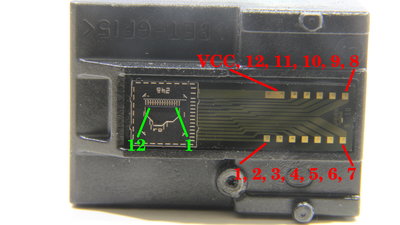
Terminals on the print head 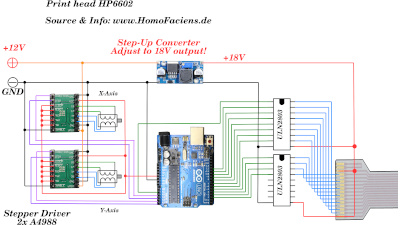
The circuit diagram for controlling the print head. Software/DownloadThe software is part of the download package. This can process bitmap files with a color depth of 24 bits. No gray scale oictures are printed. All points below a threshold are interpreted as black, points above as white.Sourcing partsWhen buying components via the affiliate partner links I have listed in the table (or through the banners on my pages) you help to keep my my projects going - many thanks!Clicking on the links does not mean you have to buy - you can simply browse through the pages ;-) Of course, supporting my freely accessible educational platform without shopping but by making a donation or becoming a Patreon also works. Many thanks to everyone who already sent me an obol! If you know more parts that are good for building circuits shown on this page, please leave a comment.
<<< Plasma printer WorldPrinter >>> News The Project Technology RoboSpatium Contribute Subject index Archives Download Responses Games Links Gadgets Contact Imprint |
|
|