|
|
|
|
News The Project Technology RoboSpatium Contribute Subject index Download Responses Games Gadgets Contact Turning a NEJE KZ3000 into a mobile laser engraving unitThe video about the mobile engraving unit NEJE KZ3000Get the NEJE DK-8-KZ3000 and other laser engravers from Gearbest.com or Amazon You also need a power bank with 2A and 1A outputs (Gearbest) and a Raspberry Pi. NEJE KZ3000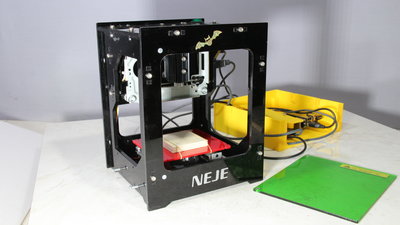
The NEJE KZ3000 is a compact laser engraver. With the built-in 3W (3000mW) laser only a few materials can be cut, which is why the term "engraver" is used instead of laser cutter. The dimensions of the device are about 16x16x20cm, the working area is 37x37mm. 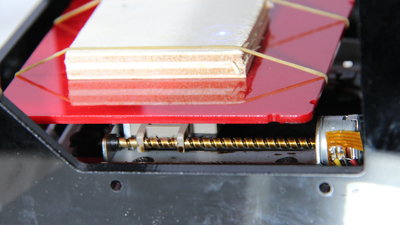
The table with the object to be engraved is moved along the Y axis by one stepper motor... 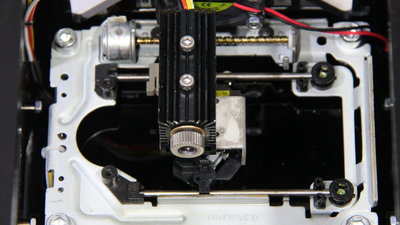
...while a second motor moves the laser head along the X axis. The guiding rails and spindles should be lubricated from time to time to keep the mechanics running smoothly. 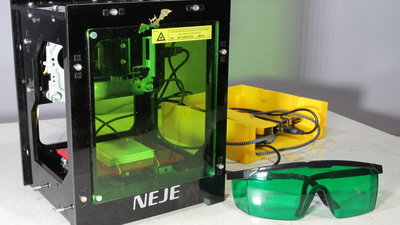
When engraving you should never look directly into the laser beam - you can risk a camera, but not an eye! The only protection is a green-tinted Plexiglas pane, which can be attached to the front of the machine with the help of magnets - the laser light can still escape through the side panels. It is therefore strongly recommended to additionally wear goggles protecting your eyes from the laser light - unfortunately they are not included. Conversion to a mobile engraving unit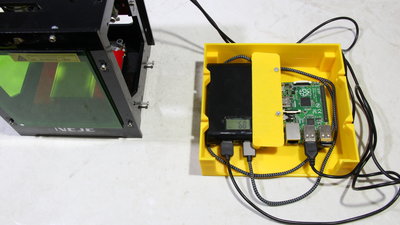
As the material is vaporized or burned by the laser during engraving, fumes are produced which stink and are anything but beneficial to health. The device should not be operated in closed living areas! That's why I turned the NEJE KZ3000 into a mobile engraving unit with a Raspberry Pi and a powerbank so that you can easily operate the machine outdoors. The files of the 3D printed socket containing the additional electronics are part of the download package. Make sure your powerbank has two outputs, one being rated for currents up to 2A, needed for the laser engraver. The Raspberry Pi is connected to the second output - no more than 1A is needed for the second output. I am using an old Raspberry Pi Model B+ without integrated WLAN which is why an USB WLAN dongle is in use. Software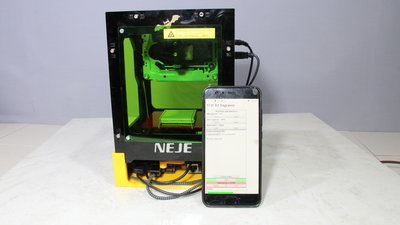
The software that ships with the engraver only runs under Windows which is a closed source operating system with integrated espionage functions - you can only trust open sources. By sniffing the USB interface, I could figure out the command sequences transmitted to the firmware and with that I wrote my own command line program, that runs under Linux. In addition, I have installed the web server Apache on the Raspberry Pi to get a graphical user interface. With that, the engraver can be operated by any device with a browser - here I am using my smartphone running LineageOS. The software is part of the download package. Samples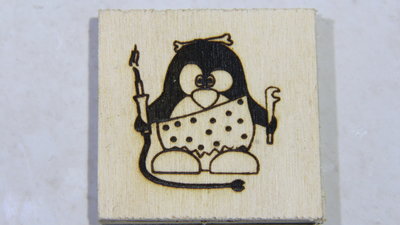
Engraving "Tux" on plywood: Laser power: 70% Burntime: 20ms Dimensions: 459x490 Pixel, 35x37mm Academically, the pixel density is 336 dots per inch (490x490pixel correlating to 37x37mm). The size of the dots depends on the accurate focussing of the laser beam and the parameters dialed - the higher the laser power and the longer the burn time, the wider the individual dots become. With the parameters used here, the job is finished in about 20 minutes - the more black dots need to be set, the longer the engraving takes. The result you can get are very good - even on close inspection no grid of dots is visible, the roughness of the surface has a greater impact on the result. 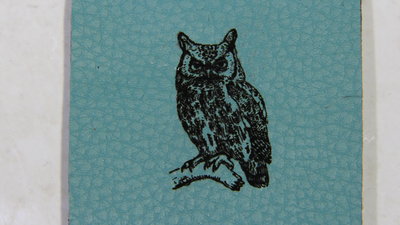
Engraving "Owl" on synthetic leather: Laser power: 70% Burntime: 20ms Dimensions: 302x490 Pixel, 27x37mm 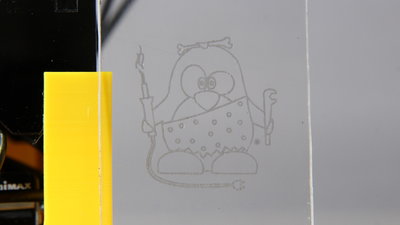
Engraving "Tux" on acrylic plastic: Laser power: 70% Burntime: 30ms Dimensions: 459x490 Pixel, 35x37mm When engraving the surface of a transparent plastic, it must be blackened beforehand with the pencil that ships with the machine - otherwise the laser light crosses the material without heating it up. With a burn time of 30ms at 70% laser power, clearly visible groves are engraved on the surface of the plastics. The result is not bad, but as you have seen, I did not cover the surface evenly with the pen - huddling during preparation is punished by bad results. Areas that were not covered by black color show broken lines. 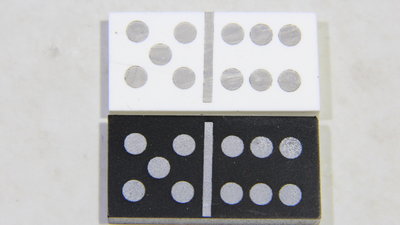
Engraving "Domino" on white plastic: Laser power: 70% Burntime: 30ms Dimensions: 490x245 Pixel, 37x19mm Covering the surface with black paint is also needed when engraving highly reflective surfaces - here I am processing white plastic. Engraving "Domino" as negativ: Laser power: 70% Burntime: 15ms Dimensions: 490x245 Pixel, 37x19mm If you spray permanent color on the surface of an object and remove it with the laser, you get a negative of the bitmap pattern. 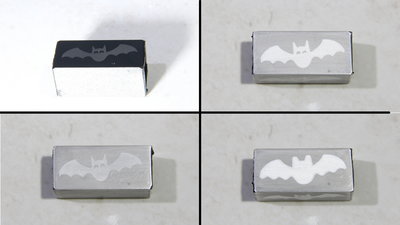
Engraving "Bat" on aluminium: Laser power: 80% Burntime: 100ms Dimensions: 490x169 Pixel, 37x13mm Metals can not be engraved, but you can machine the surface indirectly: For this I sprayed a piece of aluminum with black paint. Since aluminum is an excellent heat conductor, I set the laser power to 80% and the burn time to 100ms - even with this, the paint is not completely evaporized. After the engraving procedure, the surface is covered with a few drops of concentrated sodium hydroxide solution. After about half an hour of chamical etching, the result is clearly visible. Not enough time and the graphics is just poorly visible, too much time and details are lost. 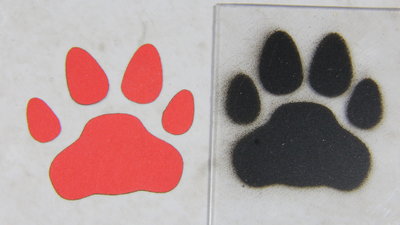
Cutting "Paw" from paper: Laser power: 70% Burntime: 30ms Dimensions: 475x490 Pixel, 36x37mm You can cut out thin materials such as paper. Colored paper absorbs the laser light better than white paper does and so gives better results. The wavelength of the installed laser is 445nm, which is in the blue range of visible light. Red, yellow or green paper absorbs this wavelength well. You can cut out templates for lacquering. Recording a video whuile doing paint work doesn't is tricky, but the result isn't that bad. 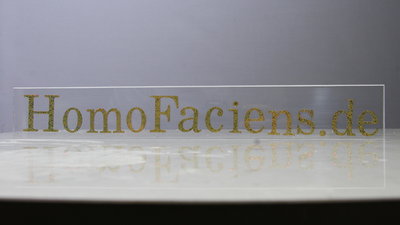
Cutting "HomoFaciens.de" from adhesive tape: Laser power: 70% Burntime: 35ms Dimensions: 360x35mm Adhesive films can also be cut out with the laser beam - here I have processed a lettering character by character. After about 7 minutes, the first letter was cut out. The machine parameters must be selected in such a way that the laser cuts through the adhesive film while the underlaying paper is kept intact. News The Project Technology RoboSpatium Contribute Subject index Archives Download Responses Games Links Gadgets Contact Imprint |
|
|