|
|
|
|
News The Project Technology RoboSpatium Contribute Subject index Download Responses Games Gadgets Contact Raspberry PiThe video about the Raspberry PiGeneralThe idea behind a tiny and cheap computer for kids came in 2006, when Eben Upton and his colleagues at the University of Cambridge's Computer Laboratory, became concerned about the year-on-year decline in the numbers and skills levels of the A Level students applying to read Computer Science in each academic year. From a situation in the 1990s where most of the kids applying were coming to interview as experienced hobbyist programmers, the landscape in the 2000s was very different; a typical applicant might only have done a little web design. Talking in plain language: The young kids could just click around colored desktops and called themselves software engineers...By 2008, processors designed for mobile devices were becoming more affordable, and powerful enough to provide excellent multimedia, a feature we felt would make the board desirable to kids who wouldn't initially be interested in a purely programming-oriented device. The project started to look very realisable. Eben (now a chip architect at Broadcom), and others formed the Raspberry Pi Foundation to make it a reality. In 2012 the mass production of the cultic computer started - although it's just the beginning of the Raspberry Pi story. A constantly growing fan base (I am a Raspberry owner since July 2012) is now coding, soldering, tinkering and writing about and with the cultic computer. A good start into the Raspberry universe is the homepage of the Foundation with the forum. Interior
The ARM11 CPU and the Broadcom GPU are sharing 256MB of RAM. There is an HDMI and a composite socket to connect a monitor, a 3.5mm audio jack, an LAN connector and two USB 2.0 interfaces are available. The maximum current running through the USB interface should not exceed 100mA. Because of the fact that even some computer mice consume a higher current, an USB hub with a separate power supply is a good upgrade of the system. The outstanding characteristic of the computer are 17 GPIOs. GPIO is the acronym for General Purpose Input Output. Each of the 17 pins can operate as an digital input or output channel. In output mode, a pin provides a voltage of zero respectively 3.3V, which can be switched by software. By using power transistors, electric devices can be turned on or off by a single pin. While switched to input mode, the software returns zero if no voltage is attached to the pin respectively one, if it is connected to 3.3V. 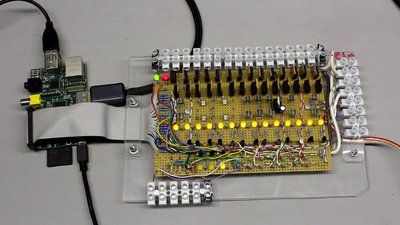
To avoid damage caused by shortcuts respectively by attaching a too high voltage to a pin, they should not be wired directly to an input or output circuit. Instead, they should be connected to an extension board, equipped with electric circuits saving the Pi from faulty voltages. The board shown here is populated with 17 small signal transistors and 17 LEDs indicating the switching status. 14 of the small transistors are driving 7 power H-bridges. 3 Pins can be used in input mode. Doing physical computing, meaning to control peripherals and so the world outside of bits and bytes is very easy with the Raspberry Pi and it's GPIOs. Meanwhile a commercial extension board is available: The so called Gertboard, developed by Gert van Loo. 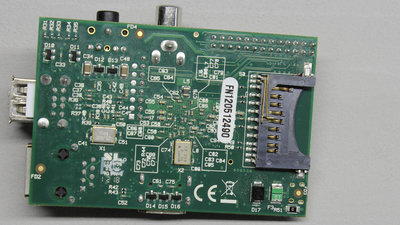
At the back of the board we can see the slot for the SD cards. A 4GB card is sufficient to install a Debian Linux distribution leaving 2GB of free disk space for your own extensions of the system. 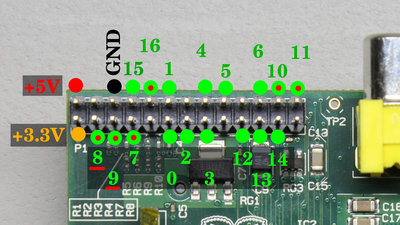
GPIO numbers used at the WiringPi software package available at drogon.net. GPIO 7, 8, 9, 10, 11 and 16 are set to HIGH level during boot process! The internal pull-up resistor at GPIO 8 and 9 can't be disabled by software. Advantages: + Very compact layout (8.5 x 5.5cm board)
+ Operating system Debian Linux available as download. + Low energy consumption. + GPIOs enable simple control of peripherals. + There is a great community behind the project offering a solution to (almost) every problem (while asking politely). Examples of use
Have a look at the pages of the Raspberry Foundation and be inspired... News The Project Technology RoboSpatium Contribute Subject index Archives Download Responses Games Links Gadgets Contact Imprint |
|
|